
This post is part of the FtW collaborative posting on miniature photography.
I want to share with you something so very very basic, that it often goes unsaid. It is one of those tips that I probably should have known about when I got in to miniature photography and blogging, but it never really "clicked" for me until a few months in.
If you're just starting out in the blogosphere and miniature photography, then this is for you. It is all about getting the background level of your image right. Now, there are lots of fancy ways you can do this in paint shop, or gimp. But I want to concentrate on the beginner. So I'm going to show you how to do this trick in Microsoft Office Picture Manager. Yes, really!
 Once you've opened up your image in said utility, go to the menu options and click on edit pictures (A).
Then, on the right-hand side, you will see a series of options. Click on "colour" and then click on the "Enhance Colour" box (B).
At this stage, your mouse pointer will magically transform in to a crosshairs. Click on a portion of the image that you think should be white (C).
And that really is all there is to it. You have now set your background level to white and enhanced the colour, and overall quality of your image in next to no time whatsoever.
For the technically inclined, the reason why this works is that each pixel in your image has a certain value. What is set as white when you open up your image may only occupy a few pixels (if any!). That means that the dynamic range of your image is vast ... and your colours are limited to that dynamic range and probably squished in to the lower regimes (especially if the image was taken in poor lighting). By changing the background level, we re-set the maximum level (i.e. what is white) and effectively alter the dynamic range of the image (by truncating colours that were previously above the new white value) so that it brings out the colours in your image that may have previously been cramped toward the lower end of the pixel values.
I first learned this trick when messing around with astronomical images. To enhance astronomical images, we define what "black" should be and truncate pixels below a certain threshold (i.e. the background sky noise) to a pixel value of zero (i.e. black). But I've digressed enough for today!
I want to share with you something so very very basic, that it often goes unsaid. It is one of those tips that I probably should have known about when I got in to miniature photography and blogging, but it never really "clicked" for me until a few months in.
If you're just starting out in the blogosphere and miniature photography, then this is for you. It is all about getting the background level of your image right. Now, there are lots of fancy ways you can do this in paint shop, or gimp. But I want to concentrate on the beginner. So I'm going to show you how to do this trick in Microsoft Office Picture Manager. Yes, really!
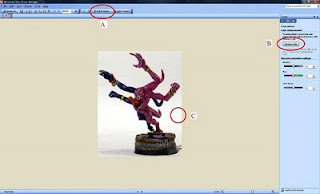
 Once you've opened up your image in said utility, go to the menu options and click on edit pictures (A).
 Then, on the right-hand side, you will see a series of options. Click on "colour" and then click on the "Enhance Colour" box (B).
At this stage, your mouse pointer will magically transform in to a crosshairs. Click on a portion of the image that you think should be white (C).
And that really is all there is to it. You have now set your background level to white and enhanced the colour, and overall quality of your image in next to no time whatsoever.
For the technically inclined, the reason why this works is that each pixel in your image has a certain value. What is set as white when you open up your image may only occupy a few pixels (if any!). That means that the dynamic range of your image is vast ... and your colours are limited to that dynamic range and probably squished in to the lower regimes (especially if the image was taken in poor lighting). By changing the background level, we re-set the maximum level (i.e. what is white) and effectively alter the dynamic range of the image (by truncating colours that were previously above the new white value) so that it brings out the colours in your image that may have previously been cramped toward the lower end of the pixel values.
I first learned this trick when messing around with astronomical images. To enhance astronomical images, we define what "black" should be and truncate pixels below a certain threshold (i.e. the background sky noise) to a pixel value of zero (i.e. black). But I've digressed enough for today!

2 comments:
Wow! just tried this and it's awesome. Thanks very much for the tip. Great stuff!
You're most welcome -- Glad that this little tip has helped!
Post a Comment